Self Test ProfiTrace and ProfiCore Ultra
Because ProfiTrace with ProfiCore Ultra provides master, bus monitor and oscilloscope in one package, it is very easy to run a comprehensive self test procedure.
Procedure follows :-
1) Remove all PROFIBUS cables from the black ProfiCore module (including Tap connector), leaving only the USB lead connecting the adapter to your computer USB port
2) Start the ProfiTrace program, then search for and start your ProfiCore adapter (by clicking onscreen Init ProfiCore button). The program should soon report scanning at the various PROFIBUS data speeds, whilst looking for any connected PROFIBUS master, here usually ending with report of Unable to autodetect baudrate – OK. Click on offered OK button and await completion of following Oscilloscope set-up sequences, before ending with display of a clear Live List chart showing all permitted device addresses in range 0 to 126.
3) If ProfiCore Ultra is not found or Licence file reported as missing after first clicking on Init.ProfiCore button , then take the offered Licence File Info Utility link, or access using top of screen Help, then click on Download & Install Licence button to access and save the required licence file for that particular ProfiCore. Alternatively download the licence file from www.procentec.com/licenses program, using the serial number of your ProfiCore Ultra, and copy this into your C:/Program Files (x86) /ProfiTrace_V2_9_8/App (or similar) folder to then enable completion of successful ProfiCore start-up, as explained above.
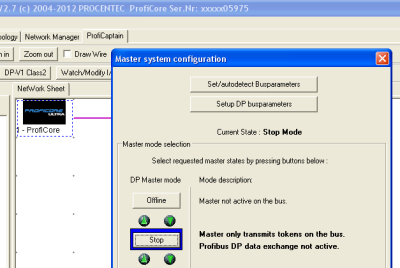
4) Next, select the top of screen ProfiCaptain Tab, then set ProfiCaptain to Stop mode. This is done by first clicking on left Setup master button or double clicking on black ProfiCore image; then click on Stop button in dialogue pane, as shown below, allowing a few seconds more for Token Ring set-up. You do not need a ProfiCaptain Software Licence for this. Click on the Close button at foot of the Master system configuration dialogue window.

5) Click on the top left ProfiTrace tab, checking the Live List display shows your ProfiCore, now operating as Master at address 1 (shown by red number 1 on white background).
6) Click on the mid-screen Message Tab, to right of the Live List Tab (with red heart), then click on the Start Message Recording button above this, soon followed by clicking on adjacent Stop Message Recording button. Confirm message telegram record lines appear below, with only Token Pass and FDL Status telegrams shown in the Service column.
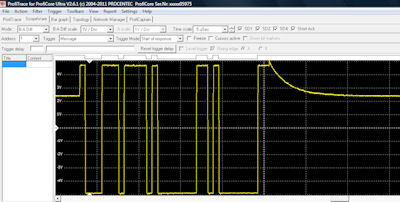
7) Next, click on the top of screen ScopeWare tab for display of Oscilloscope waveforms, soon followed by double click on the Master tile (Addr.1) in the lower screen Live List to synchronise the moving scope waveform. If necessary adjust on-screen Time scale settings to see following waveform, or similar. Note high waveform amplitude of over 9 volts.

8) Now click on the top of screen Bar Graph tab and confirm single green bar, with similarly high voltage level of over 9 volts shown below for waveforms from device at address 1 (your ProfiCore).
9) When the Live List, Message recording, Scopeware and Bar Graph all show acceptable results, your ProfiCore Ultra hardware, USB cable and ProfiTrace software are functioning correctly.
10) IMPORTANT : Remember to stop your ProfiCaptain program scanning BEFORE next connecting your ProfiCore Ultra to a live network! (as it will otherwise most probably stop that network from operating successfully!). To do this, select the ProfiCaptain Tab, double click on the black ProfiCore Ultra image, then click on the Offline button : close this dialogue. Return to the Live List page, now noting new yellow tile at the previous master address 1 location, showing that this device is now ‘lost’.
(With thanks to Dennis van Booma, Procentec, for original procedure outline, which has here been extensively revised for 2021).
Notes : 1) For first time users, the above procedure may well take 15 minutes or more to complete successfully, as you get to know your way round your ProfiTrace displays – but once completed successfully a few times this complete procedure can be run in less that 2 – 3 minutes. It is then strongly recommedend for use on future occasions, before leaving your office for on-site work, particularly if travel needed, or you have not used the kit for a while. Prior checking, can save no end of embarrassment and frustration, should you later find that your normally trusted test kit does not start-up successfully when connected to a live, or worse, failing, plant!
2) If you connect a PROFIBUS cable to the ProfiCore Ultra for the above procedure, you can use the Scopeware display to measure the cable length – click on this link for further details and waveform example.
3) The ProfiCaptain Stop mode is also very useful for scanning and commissioning of even large and complex PROFIBUS networks, down to single equipment panels or individual cable segments, as it will find and display any connected slave devices in the normal Live List, together with driver voltages (bar graphs) and waveforms too, here with the ProfiCore Ultra acting in place of any other PLC / Master. See ProfiTrace for New Network Commissioning link for further details.